Sunday, December 20, 2009


Took like 15 minutes and tried out my new skis.  So fun.


Testing my new skis from nate myton on Vimeo.

Saturday, December 19, 2009

Skis


177cm 128-97-128mm
Just need to seal the sidewalls and drill the inserts out for my bindings.

Thursday, December 17, 2009

Pictures


WOOHOO!!!

Just pulled my first ski out of the press and put the second one in.  That will be removed tomorrow morning.
The ski looks great.   Pictures will follow.

Tuesday, December 15, 2009

A mad dash.

I'm nearing the finish.  Much has changed since my last post, but I haven't had time to document and upload it.  I've been quite busy trying to finish the skis before I leave on Christmas break, 7 short days from now.  I hope to press my first ski tomorrow.  Photos will come soon (unlikely).

Monday, November 16, 2009

Core

I've begun to work on the actual "make a ski" part of this whole process.  I laminated the core out of redwood and pine, with walnut sidewalls..  I chose redwood because I had a nice long piece of it with very straight, vertical grain.  Since the grain was already very regular and vertical I didn't cut it into small strips and re-laminate it as many builders do.  The core is one piece of redwood about 4" wide.  On either side of that is pine, and finally on the outside is walnut.  Pine was chosen since it was on hand and has a nice light color.  Walnut was chosen for the sidewalls because it was on hand, it's stiff and hard (hopefully will make for good impact resistance), and it has a nice dark color.  I glued it all together with wood glue.

The first step was to glue together the redwood and pine.


Next step was cutting it out to the correct dimensions for the ski, minus 1/4" all around for the walnut sidewalls to be attached afterwards.  This allows the sidewalls to follow the sidecut of the ski.  To cut the core I had planned to create a 1:1 scale printout of my design, cut out a Masonite template to match that, and then use that temple to route the actual cores.  My plan was thwarted by the fact that I was unable to make a really satisfactory template.  So I decided to make a nifty jig based on the one used by Michael from 333skis.  After a lot of trial and error and frustration I was successful.

Basically it's a 2"x4" spine with 1/4" slots cut with a dado blade.


 In the slots go shims cut from Masonite to the dimensions of the skis (minus 1/4" on each side to account for the rails).  The rails are also made from Masonite.  In the slots go shims cut from Masonite to the dimensions of the skis (minus 1/4" on each side to account for the rails).  The rails are also made from Masonite.  The shims keep the rails from moving inward..  There are also 9 piece of threaded rod that keep the rails from shifting out.  To determine the lengths of the shims I first cut the middle and end shims based on the desired dimensions for the skis.  Then I tighten the bolt in the middle and allow the Masonite to curve naturally into an arc.  Then I measure at each of the other slots and make shims that just fit.


Then I screw down the core and run the router along the rails.


After the core is cut to the proper dimensions I glue on the walnut sidewalls.

Quiver


Line 5-0 90cm
Revel8 Revolt Chicken 105cm
Spruce 120 120cm (dad's)
Vokl P40 170cm (dad's)
New Ski Template 175cm
dimensions for the new ski are 136mm-101mm-136mm, quite similar to the Spruce 120s but lengthened.

And I've had some trouble with my bladder.  It had a hernia.  I think air from the valve hole leaked between the layers of the hose.  It inflated into a big lump, then a tiny hole popped in it to let the air leak out.  I thought it was going to explode violently so I watched from behind a door.  I was able to cut off the damaged part and reattach my hardware.  Not the end of the world.  The hernia happened while I was testing it at about 60psi.  I plan to press at 35-40psi.  After the repair I've left it for 3 or 4 days at 35psi and it has lost all of 2 or 3 psi.  Very acceptable in my opinion.

Here's a photo of the inside of high pressure discharge hose, if you're interested.  Just a bunch of nylon strings running 0 and 90 degrees.  The actual hole from the leak was actually quite small.  I cut it open to look inside. As you can see the outermost layer of the hose lifted away from the core of the hose making a bubble.

Saturday, November 7, 2009

Fire hose and Profiling Jig. Nearing completion.

My fire hose arrived.  They sent me 12' instead of the 10' I ordered so I decided to make a baby size test piece.  I used 1" angle iron bolted together with 5/16" Grade 8 bolts to seal the ends.  For the valve I used a tire stem very similar to This one.  I got it from a local tire store who graciously gave to me for free. (Thanks Mr. Hill)  I also got some larger steel and rubber washers from the hardware store.


I installed the whole thing into my hose as shown:


Large steel washer and large rubber washer underneath hose.  The same reversed above the hose.  Above that the rubber washer that came on the tire stem and the steel washer that came with it.  On the top the nut.  Teflon tape on the threads of the stem.


The little hose held pressure decently, so I decided to move it up to the larger scale.  Unfortunately, when I inflated the big piece of the hose I discovered a hole almost exactly in the middle of it.  I called Heartland Pump (where I purchased the hose) and they were very helpful.  They sent out a new piece of hose that day (free) and I received it 2 days later.  This new piece hasn't leaked in the body at all.  It seems that air leaks out of the threads of the bolts clamping the ends of the hose.  I think some Teflon tape will solve this.  Other than that the hose is a success.


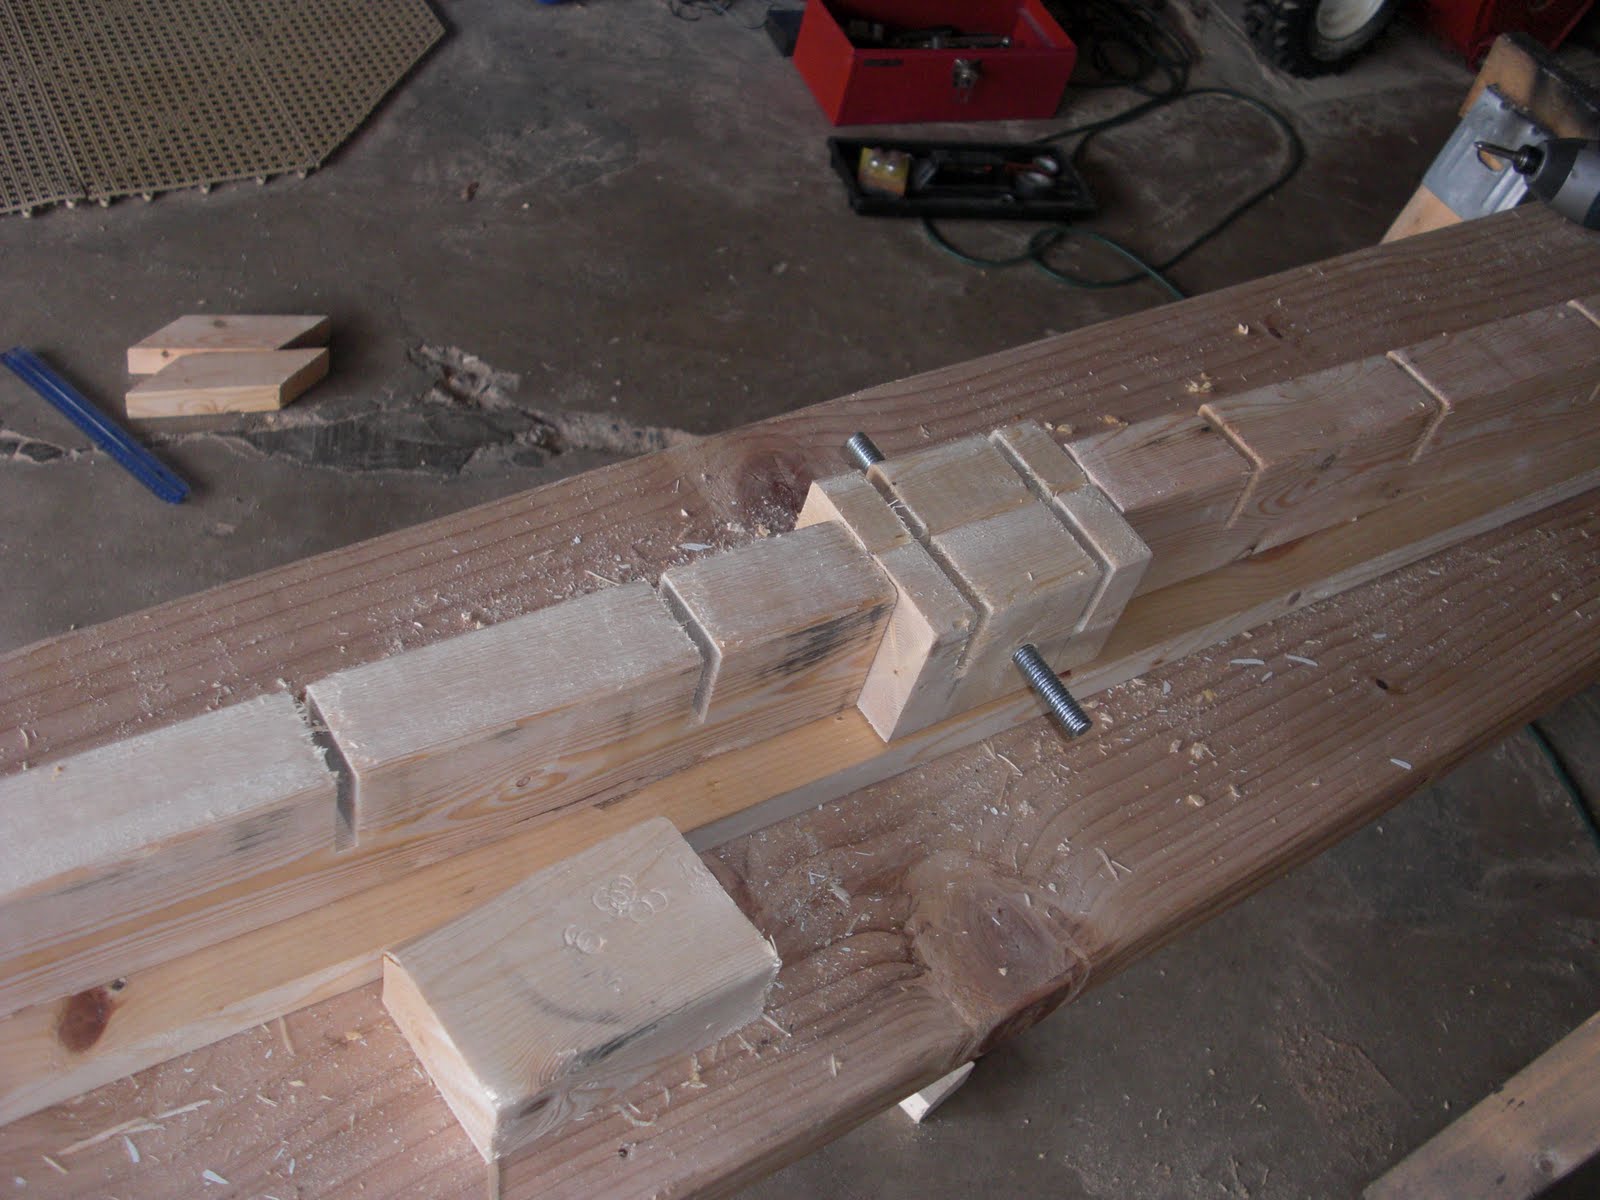
I have also completed the router bridge I will use to profile my cores.  I think my design is pretty original.  I combined several ideas I had seen on the skibuilders.com forums for adjustable planer cribs and adjustable router bridges and adjustable molds.  It has a plywood base with flat rails running the length of it.  The router rests in a crib that runs on these rails.  The router can move across the width of the crib, and the crib slides lengthwise along the rails.


Two pieces of MDF are screwed onto the plywood base.  They are only attached in the middle, however.


 At then ends I have T-Nuts hammered into the plywood base.  These have bolts that screw into them with a Phillips head.


  I drilled holes in the MDF to allow me to adjust them with a screwdriver without taking the MDF off.  By screwing them up I bend the MDF up at the ends.  The core then goes onto the MDF and is bent to match the curve of the MDF.  It will be held down with doublesided tape or screws on the waste portion of the wood.
This allows me to shape the core to be thinner at the ends and thicker at the middle.

And finally here's a picture of the almost complete press.


From top to bottom:
Top Beam
Top Mold
Fire hose
Cat Track
1/8" Masonite
Ski
1/4" Masonite
Bottom Mold
Bottom Beam

My latest purchases:
10' of 6" discharge hose: $45
4' of 1" angle iron: $8
10 5/16" Grade 8 Bolts and Nuts: $11
Rubber and Steel Washers: $1

Total thus far: $157
Final expected purchases:
Cordura wraps: ~$40?
Hopefully that's it, which would leave me at just under $200.

Cost of 1 pair of skis:
Everything but core and epoxy (skibuilders.com): ~$90+shipping
Core: Free (have wood already)
Epoxy: ~$20/ski? (not sure here)
Total: ~$130

Tuesday, October 27, 2009

Lots of progress

Latest progress:

Completed the top and bottom beams.
I bolted together the 2x4's and 2x6's with some fairly beefy hardware.  5.5" x 1/4" lag bolts (right-most in photo) and 4" Ledger Lock bolts (2nd from right).  For the lag bolts I drilled once with a ~1" Flat bottom forstner bit (middle) to make room for the head of the bolt, then a 1/4" bit (2nd from left) an inch in, and finally a small bit (left) in 3" or so.  For the Ledger Lock bolts I just used the forstner.  Here's my quiver of bits and bolts.


Here's one beam completed.  I used 4 lag bolts and 3 of the Ledger Locks per side per beam.  They're pretty stout to say the least.


I also added a base the the bottom beam.  It's made of a 2' 2x6 perpendicular to the beam, with 2x4" legs on either end running parallel to the beam.  It's made so that I can slip the bags over the beams without interference.  It turned out fairly stable.


I completed my cat-track.  I ripped 8" pieces of 2x4' into 1" strips with 15 degree bevel.  I got 5 strips per 2x4. The two end strips were only beveled on one side, but that's not an issue.  I flipped it over after each cut so that I could get the strips in the middle beveled on each side (like / \).  Having bevel like this allowed it to curve to the radius of the tip/tail without gaps.


I then drilled 2 holes in each strip and ran rope through them all.  The end result is a cheap (free), easy, and strong cat-track that I hope will do the job for me.  Rope isn't ideal for the task since it doesn't allow the pieces to slide around as easily as some wire might have, but it will work.


Finally I made an adjustable top mold.  I used a bunch of 2' 2x4 pieces.  The shape is quite rough.  We'll see if it's necessary to make it match closer to the bottom mold, I'm thinking it might not be necessary.  As it is it's completely flat until the tip pieces.  No adjustments were made for the camber.  We'll see how it looks when the hose comes in.


I ordered 10' of 6" discharge hose from here.  It's on it's way.  That adds $36 to my tab.  I think my shipping was free.

Saturday, October 24, 2009

Budget Update

My recent purchases:

Wood glue: $7
3' 3/8" threaded rod: $4
4 3"x3/8" carriage bolts: $3
nuts and washers: $1
16 5-1/2"x1/4" lag bolts: $7
1/8" Masonite 7-12"x8': $3

Total: ~$25

Add that to the money spent on wood earlier and I'm at $92.  I'm hoping that a sheet or two of 1/8" Masonite ($3) might be able to substitute for an aluminum sheet ($40).  Still need to find some firehouse and decide on my epoxy.  I'm planning on maybe using some nice redwood I have in the garage for my core, and getting the rest of my materials from skibuilders.com

Thursday, October 22, 2009

Progress

It's been a bit since I updated last.  Since then I've finished the tip pieces.  This involved cutting about 1/2" from the bottom of each,

drilling a hole through all of them to put a bolt through,


gluing them together,


 and finishing with a little belt sanding.

I have also nearly completed the bottom (camber) mold.  Unfortunately this process did not go nearly as smoothly for me as finishing the tip pieces.  I also failed to get many pictures since I was working by myself.
My first step was to drill two holes through the entire width of the mold.  I wrongly assumed that I could do that without the help of my drill press, so I did it with just a handheld power drill.  I clamped all the strips together and drilled as far as my bit would let me, then took off the first couple strips and continued the hole where I left off.  The idea seemed sound at the time, but I ended up with a hole that was not at all square.  That in itself might not have been a huge problem, but I also ended up with the pieces all mixed together, so when I went to put the bolt through the hole nothing lined up at all.
So, I had to go back and do it the right way using my drill press, which produced much better results.

With that finally finished came gluing everything together.  I used Gorilla Glue Wood Glue which, as it turns out, drys very quickly on MDF.  I realized when I was about 2/3 of the way done gluing up the camber mold that it would have been much better had I simply glued 2 or 3 strips, made sure they were aligned, clamped, and let dry for 10 minutes, repeat.  Instead I tried to glue all 10 strips in one go.  The end result isn't horrible, but it's not as nice as I might like either.  Oh well, live and learn.

Wednesday, October 14, 2009

Tip and Tail Pt. 2

This is shows the bottom beam, which is made out of 2 2x4s and 3 2x6s.  On top of that, is the bottom mold (which provides camber) made of MDF strips, on top of that will go the tip and tail pieces, and in the gap between tip and tail pieces will go a sheet of 1/4" MDF.


I cut out the tip and tail pieces using the jigsaw, then routed them using my Masonite template.


There are 10 pieces that make up a tip/tail mold.  8 of them sit nearly flush on top of the MDF bottom mold, and two of them are taller and sit down into the gap between the ribs of the bottom mold.


All of the pieces will be cut down in height so that they can abut flushly to a sheet of 1/4" Masonite.

Monday, October 12, 2009

Tip and Tail Pt. 1

Today I started work on the tip and tail pieces for the bottom mold.  I made a template on 1/4" Masonite (hardboard) by tracing the tip from my dad's skiboards, then freehanding with the jigsaw.  I planned to finish it using some sort of jig and the router table, but I couldn't work out the jig satisfactorily, and my freehand cut turned out surprisingly well, so I just finished a little with the belt sander and called it good.  Then traced it 16 times on my MDF.  4 of the pieces are extra tall, and it just occured to me that I actually need to cut 20 pieces.  Tomorrow I'll hopefully have time to cut them out with the jigsaw and start finishing using my template and the router table.

Sunday, October 11, 2009

Bottom Mold.

My first step in making my press was to rip the MDF into 7 3" strips and 1 3.5" strip. I used a skill saw for that, and did a pretty poor job due to the way I set it up. These strips will form the bottom mold and give the ski it's camber.

The next step was to make the 3.5" strip into the template for all the other strips. To draw the curve I wanted I clamped a strip of MDF along the length of my template strip. I clamped it at 1.75" at the ends and 2.75" in the middle. Then I traced it to make the line.

I'm not sure yet if that's going to be too much or too little camber. 1" is about 25mm, which is quite a bit of camber, but my average ski will not be 8' long, so will (hopefully) have more like 20mm, and I expect the actual ski will relax some after it comes out of the press.

After tracing the line I wanted I made a rough cut using a jigsaw.

Then I mounted my beltsander on its side on a table, and used that to finish the template.


Next I traced the correct shape onto the remaining 3" strips using my template and rough cut them with a jigsaw.

Finally, I set up my router with a flush-cut bearing bit. I taped a rough cut strip to the template using double-sided fiberglass carpet tape and then used the router to bring the rough strips down to exactly the shape of the template. Taking it slow and easy was definitely the right way to go for this step.


In the end I was left with 8 identically rounded strips of 3/4" MDF.
Next step is to create the tip and tail pieces using basically the same method.

SNOW!

This morning I woke up to a beautiful sight.

Saturday, October 10, 2009

Purchasing Materials

I went into this project with the knowledge that I could buy a new pair of skis for about the same amount of money I would be spending. And the skis would be of higher quality than those I could produce. However, I decided to pursue the project anyways. My estimated cost for the press was about $200 (though I fully expect I'll go over due to unexpected costs), and the estimated cost for a pair of skis was $120.

Friday I went to the local hardware stores to buy
the lumber I'd need for the project. I purchased:

4 8' 2x4 @ $2.05/ea
6 8' 2x6 @ $3.15 /ea
6sq ft 1/4" masonite (8"x6') @ $0.59 /sq ft
1 4'x8'x3/4" MDF @ $32.95 /ea

All together with taxes it set me back $67.39.

This should be all the wood I need to buy for the press.


Still to be purchased is aluminum (~$29), angle iron (~$16), fire hose (~$50), and Cordura bags (~$40).

The press begins.

My goal is to create skis. But there is more to it than that. For the price of the press and the materials I could buy a pair of skis. I think the entire process from designing the press to making it, to finally pressing a pair of skis will be more valuable than a simple pair of skis. This blog will record my progress.